This post shows you how to use a Windows computer as a VPN server. This might be helpful in many scenarios. For example:
Employees need to connect to a company LAN from outside the office
You want to securely access the Internet from a coffee shop or airport
You have a friend in a foreign country who needs unblocked access to the Internet
After you’ve followed along with this tutorial, you’ll have a working L2TP/IPsec server on your Windows computer.
Step 1. Open Firewall
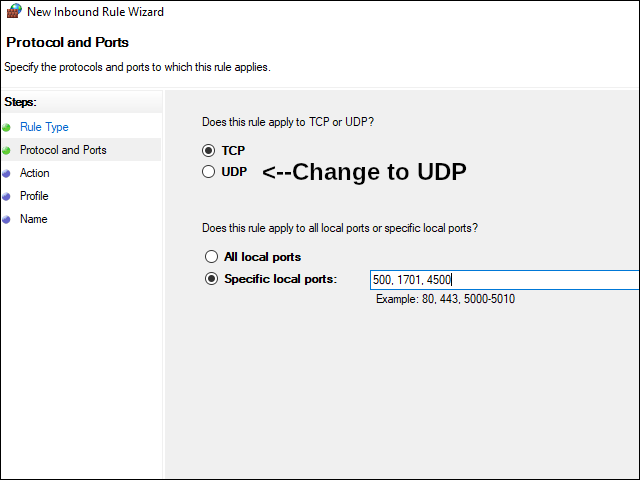
For traffic to reach an L2TP/IPsec server, you need to open ports 500/udp, 1701/udp, and 4500/udp in your computer’s firewall. On your Windows computer, you do that like this:
In the Windows search box (next to the Start button), type firewall
Select Windows Defender Firewall with Advanced Security
In the left pane, click Inbound Rules
In the Actions pane on the right, click New Rule…
In the New Inbound Rule Wizard window, select Port, and click Next
In the Protocol and Ports window, select UDP, and in the Specific local ports field, type 500, 1701, 4500 and click Next
In the Action window, select Allow the connection, and click Next
Check all profiles, and click Next
Enter a Name such as L2TP/IPsec, and click Finish
Close the Windows Defender Firewall with Advanced Security
In a typical home network, where you are behind a router, you also need to:
Open ports 500/udp, 1701/udp, and 4500/udp for input
Port forward these ports from your router to your PC
Instructions for doing the above vary from router to router. Consult your router documentation to learn how to do these steps on your particular make and model of router.
One more point about home PCs! You need a Power Plan that ensures your computer will not be asleep when clients try to connect. You can change the power settings on a Windows PC like this:
Right-click on the Windows Start button, and select Settings
Click System
Select Power & sleep
Change the settings for Sleep to Never
When you’re done, close the Settings app.
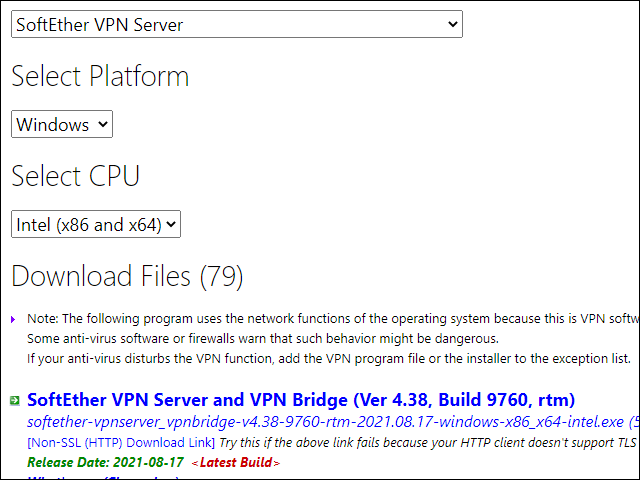
Step 2. Download SoftEther VPN Server
Now for the download of the SoftEther VPN installer:
In your Downloads folder, find the Installer executable. It will have a name that looks like softether-vpnserver_vpnbridge-v4.38-9760-rtm-2021.08.17-windows-x86_x64-intel.
Run the installer executable.
Read the initial information screen, then click Next
If User Account Control pops up, click Yes to allow changes to your device
Select software component SoftEther VPN Server, and click Next
Read the End User License Agreement, check the box to agree to the End User License Agreement, and click Next
Read the Important Notices, and click Next
Accept the default directory, C:\Program Files\SoftEther VPN Server, and click Next
On the Ready to Install screen, click Next
Wait while the installer runs. A SoftEther VPN Server Manager icon is created on your desktop. At the end of the installation, leave the box checked to immediately run SoftEther VPN Server Manager, and click Finish.
Step 4. Set the VPN Server Password
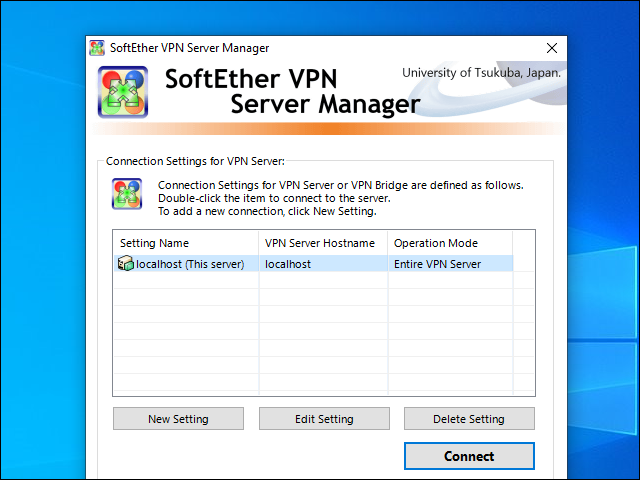
The SoftEther VPN Server Manager is started for you by the installer.
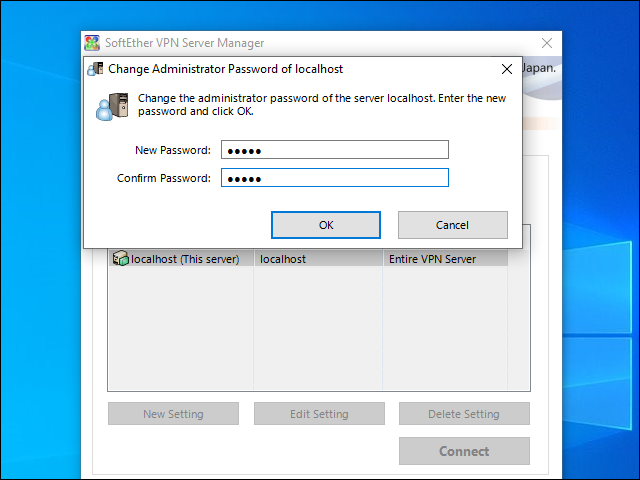
Leave the server localhost (This server) selected, then press the Connect button. The first time you do this, you will be prompted to enter and confirm a password for the server. Click OK when you’re done.
Click OK on seeing the password change confirmation box.
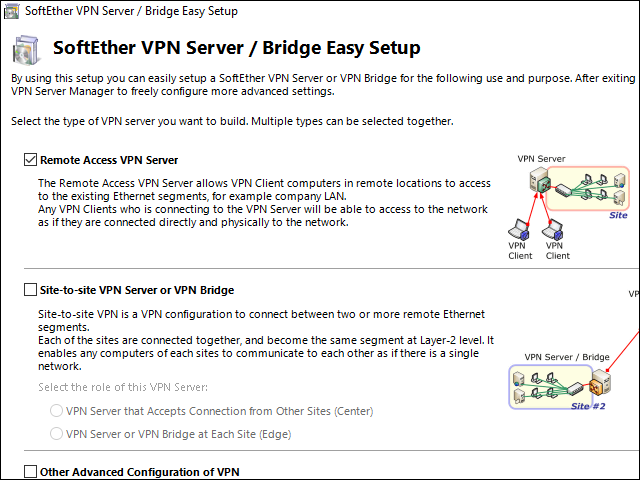
Step 5. SoftEther VPN Server Easy Setup
The first time into the server, a wizard walks you through the SoftEther VPN Server Easy Setup process.
Step 5a. Create Virtual Hub
Check the box for Remote Access VPN Server, and click Next.
A message appears saying that the settings of this VPN Server will be initialized. The box asks if you really want to do this. Click Yes.
Give the Virtual Hub a Name, such as the default of VPN, and click OK.
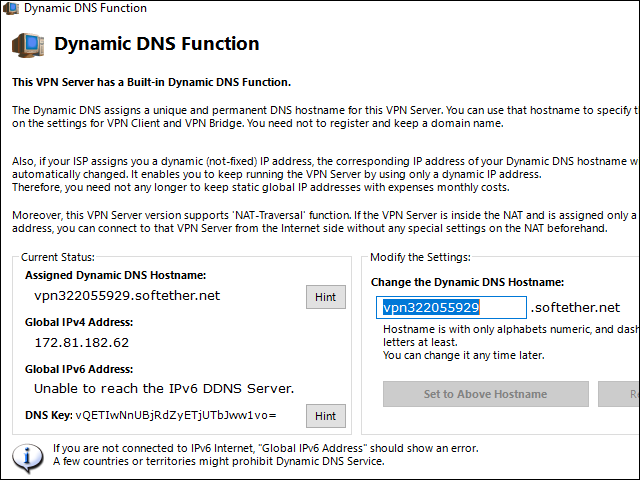
Step 5b. Dynamic DNS Function
SoftEther automatically assigns you a dynamic DNS name. It will look like vpn322055929.softether.net.
Click Exit.
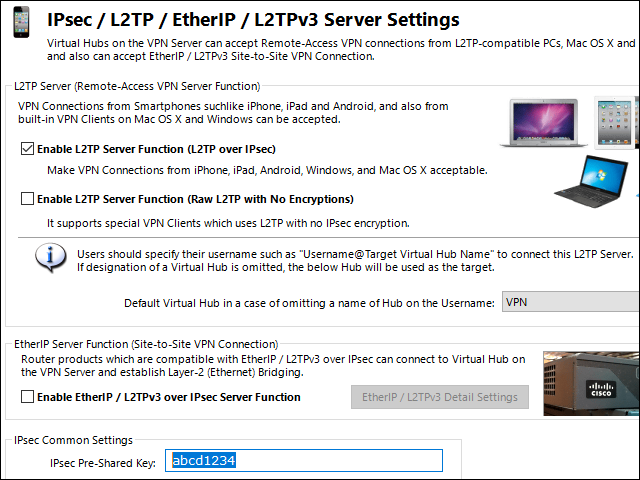
Step 5c. IPsec / L2TP / EtherIP/ L2TPv3 Server Settings
Check the box for Enable L2TP Server Function (L2TP over IPsec).
Enter a preshared key in the IPsec Pre-Shared Key box. It must be eight characters – for example, abcd1234.
Click OK.
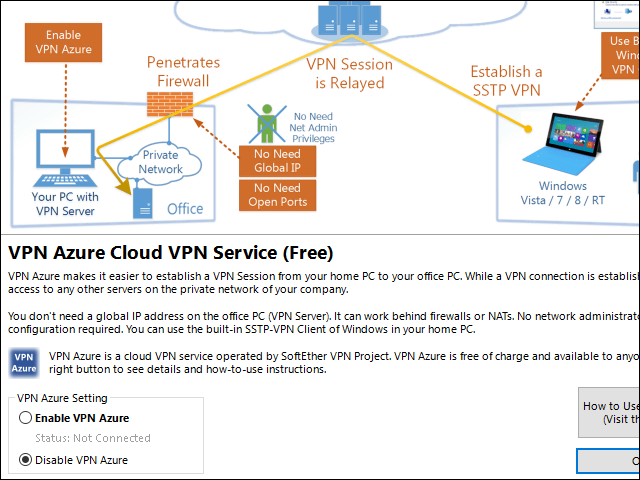
Step 5d. VPN Azure Service Settings
Select the radio button for Disable VPN Azure.
Click OK.
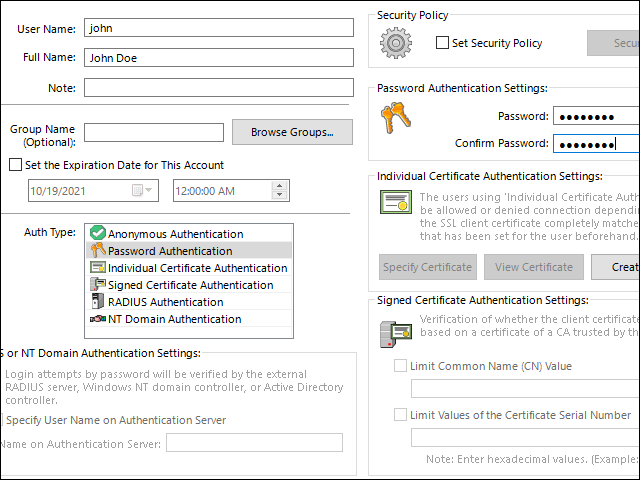
Step 5e. Create User
Click the button Create Users.
Enter a username
Enter the full name for this user
Select Auth Type Password Authentication
Enter and confirm the password
Click OK
When the confirmation box appears, click OK
Since we need only one user for now, click Exit
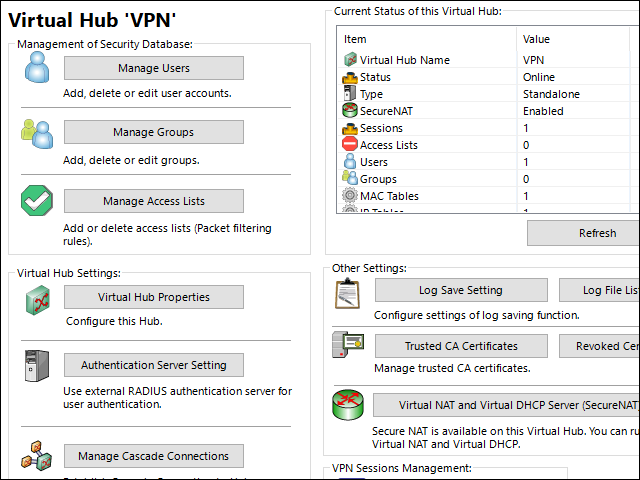
Stef 5f. Enable SecureNAT
SecureNAT function is an innovative proprietary technology developed for SoftEther that enables the creation of a more secure network. SecureNAT provides two functions: virtual NAT and virtual DHCP.
On the screen to manage the VPN server on localhost:
Select the row for the default Virtual Hub, which we named just VPN
Click Manage Virtual Hub
Click Virtual NAT and Virtual DHCP Server (SecureNAT)
Click Enable SecureNAT
Click OK
Click Exit
Click Exit
You server work is done for now. Let’s test it with your first client.
Step 6. Install and Configure Client
An L2TP/IPsec client is built in to many devices. We will use a Windows client to test the server. The client PC must be a different PC, and at a different location, from the server PC.
On the client PC, in the Settings app, open the Network & Internet section. Select the VPN screen. Click Add VPN.
For the VPN Provider, select Windows (built-in)
Put a connection name of your choice, e.g. New York
For server address, put the one assigned to your server, e.g. vpn322055929.softether.net
For the VPN type, select L2TP/IPsec with pre-shared key
For the Pre-shared key, type the one you specified on the server, e.g. abcd1234
For Type of sign-in info, select User name and password
For the User name, type the one you set up on the server
For the Password, type the one you set up on the server
Check Remember my sign-in info
Check Save
Step 7. Test Client to Server Connnection
On the row for the VPN connection you just added, click Connect. The status changes to Connected.
X-UI provides a graphical user interface for managing servers and users. You can visually build servers for Shadowsocks, V2ray, Xray, Trojan, and other popular protocols. You can also monitor VPS performance and traffic usage in real time. X-UI replaces the older V2-UI panel.
Preparation
Before you begin, you need to do three or four things:
Get a virtual private server or VPS. You can get a VPS from many providers. Some popular ones are AWS, Google Cloud, Microsoft Azure, DigitalOcean, Hetzner, and Vultr. In our example we use a Debian 11 VPS, but the X-UI install script supports Ubuntu 16+, Debian 8+, or CentOS 7+. You need to have ports 80 and 443 on your VPS open for TCP input. Also open port 54321 for TCP input.
Get a domain name. Some low-cost registrars are Porkbun, Namesilo, and Namecheap.
Create a DNS A record pointing from your host name to your VPS.
Optionally, add your domain to Cloudflare. This will allow you to insert a content distribution network or CDN in between you and your server. However, if you are going to add a CDN, do not turn on proxying in Cloudflare until the end. For now, just use the DNS features of Cloudflare. Adding your domain to Cloudflare is optional, and you can continue to use your domain name registrar’s nameservers if you prefer. In any case, not all protocols support the use of CDN proxying.
Update Server
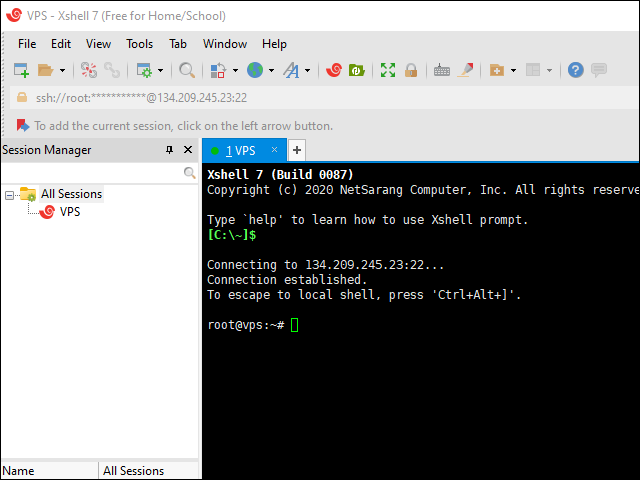
SSH into your server. On Windows you can use the built-in PowerShell app, or you can install a terminal emulator such as PuTTY or XSHELL.
Get your server up to date:
1
apt update && apt upgrade -y
Also install curl and socat:
1
apt install curl socat -y
Install Acme Script
Download and install the Acme script for getting a free SSL certificate:
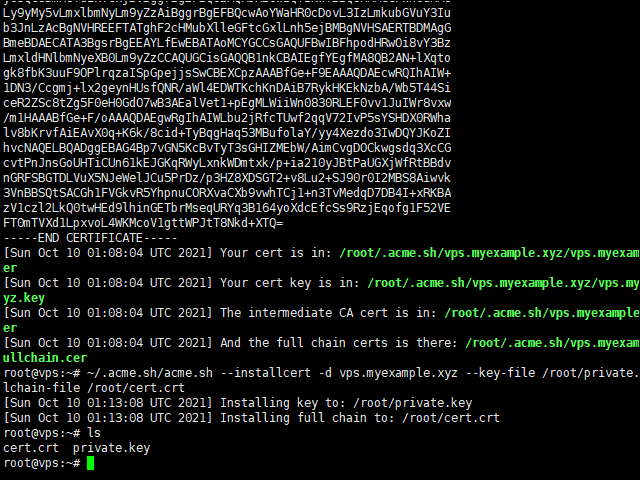
After a minute or so, the script terminates. On success, you will receive feedback as to the location of the certificate and key:
1
2
3
4
Your cert is in: /root/.acme.sh/host.mydomain.com/host.mydomain.com.cer Your cert key is in: /root/.acme.sh/host.mydomain.com/host.mydomain.com.key The intermediate CA cert is in: /root/.acme.sh/host.mydomain.com/ca.cer And the full chain certs is there: /root/.acme.sh/host.mydomain.com/fullchain.cer
You cannot use the certificate and key in their current locations, as these may be temporary. Therefore install the certificate and key to a permanent location. In the next command, replace host.mydomain.com by your actual host name:
From the command line, you can control the server with various commands:
Command
Effect
x-ui
Display the management menu
x-ui start
Start the X-UI panel
x-ui stop
Stop the X-UI panel
x-ui restart
Restart the X-UI panel
x-ui status
View X-UI status
x-ui enable
Set X-UI to start automatically after boot
x-ui disable
Cancel X-UI boot from start
x-ui log
View X-UI log
x-ui update
Update the X-UI panel
x-ui install
Install X-UI panel
x-ui uninstall
Uninstall X-UI panel
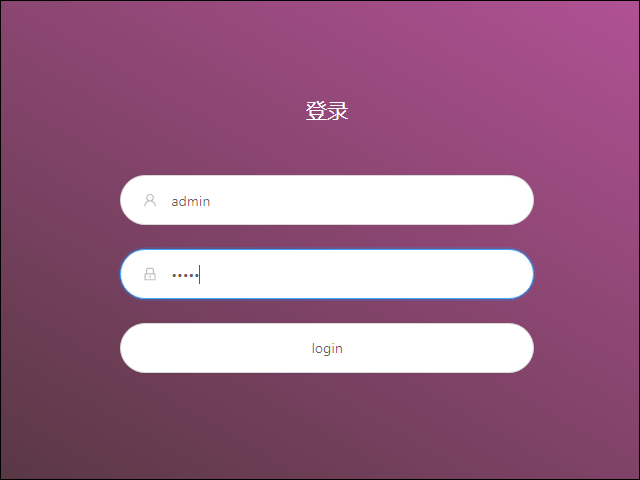
First Time Login
You can get to the X-UI panel on your PC by opening a browser and typing your server IP address and port 54321. For example:
1
http://123.45.67.89:54321
By default, the login user name is admin, and the password is also admin.
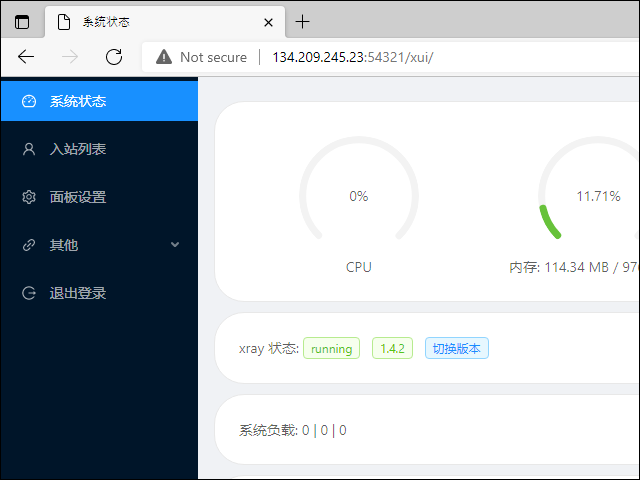
Side Menu
After you have logged in, the side menu offers these options:
Chinese
English
系统状态
System status
入站列表
Inbound list
面板设置
Panel settings
其他
Other
退出登录
Sign out
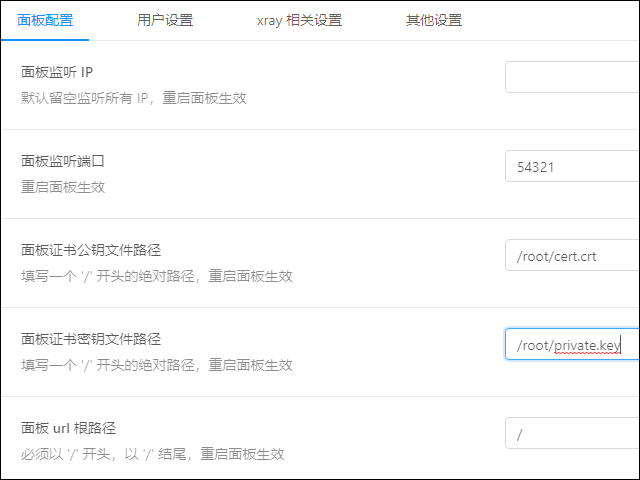
Enable HTTPS on Panel
You will notice that, at first, you used plain text HTTP to reach the panel. This is not secure.
To enable HTTPS, choose 面板设置 (Panel settings).
You will need to specify your certificate and key.
1 2 3 4
面板证书公钥文件路径 填写一个 '/' 开头的绝对路径,重启面板生效 Panel certificate public key file path Fill in an absolute path starting with'/', restart the panel to take effect
Fill in /root/cert.crt.
1 2 3 4
面板证书密钥文件路径 填写一个 '/' 开头的绝对路径,重启面板生效 Panel certificate key file path Fill in an absolute path starting with'/', restart the panel to take effect
Fill in /root/private.key.
Save these options.
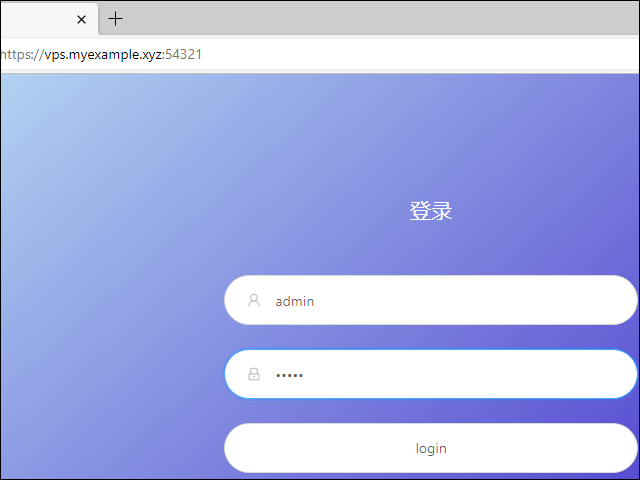
Now in your SSH session issue the command:
1
x-ui restart
Now you can reach the panel using HTTPS. For example:
1
https://host.mydomain.com:54321
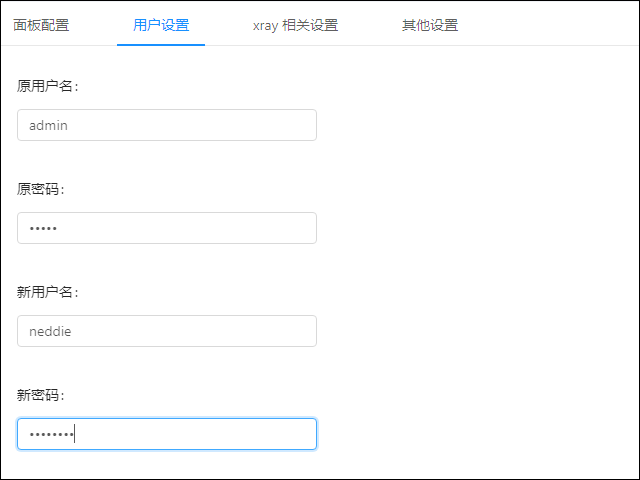
Change Admin Password
The default admin user name admin and password admin are the same for all installations. This is not secure. Input the old values of admin and admin, and choose new, unique values:
Chinese
English
原用户名
Original user name
原密码
Old password
新用户名
New user name
新密码
New password
Save the new values.
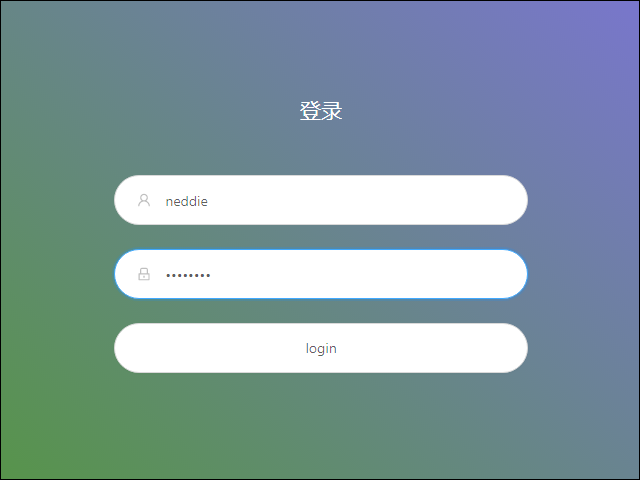
Sign out, then sign in again with the new user name and password.
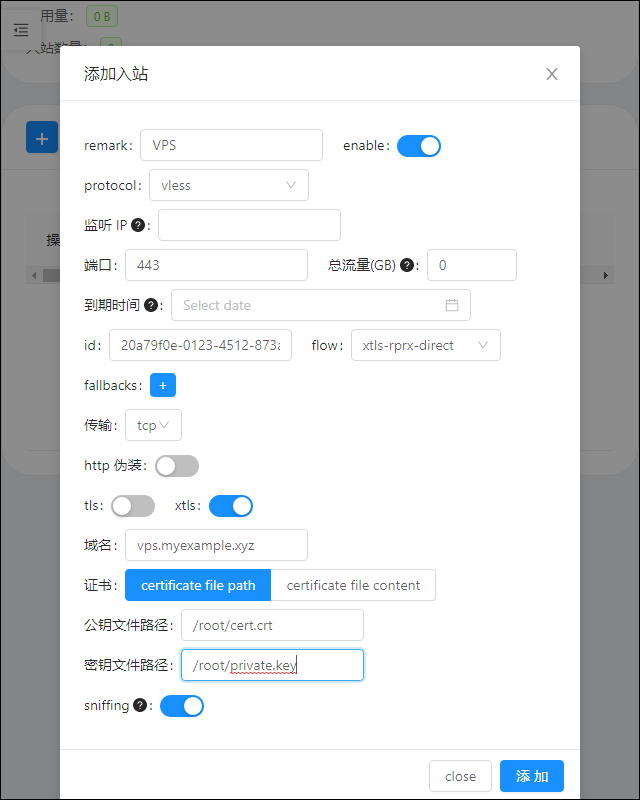
Add VLESS+XTLS Xray User
We are going to add an inbound user account using VLESS and Xray. VLESS is an an updated version of the older Vmess protocol. After several developers found flaws in Vmess protocol and showed that the Vmess protocol can be detected by deep packet inspection or DPI, VLESS was developed. (Note that it is plain Vmess that can be detected; Vmess+WS+TLS is still secure and supports the use of a CDN.) Xray core was developed as an alternative to the older V2Ray core. According to the Xray developers, Xray is more stable, better for UDP gaming, and 30% faster than V2Ray. XTLS speeds up TLS by reducing double-encryption.
On the side menu, select 入站列表 (Inbound list).
Click the plus sign to add a new inbound user.
The 添加入站 (Add inbound) box appears.
Enter fields as follows.
Field
Contents
Remark
Put a unique and meaningful description
Enable
On
Protocol
vless
监听 IP Listening IP
Leave blank
端口 Port
443
总流量(GB) Total bandwidth (GB)
0 means unlimited
到期时间 Expiry date
Blank
Id
Leave the generated UUID as is
Flow
xtls-rprx-direct
Fallbacks
None
传输 Transmission
tcp
HTTP 伪装 masquerading
Off
TLS
Off
XTLS
On
域名 Domain name
Put your host name, e.g. host.mydomain.com
公钥文件路径 Public key file path
/root/cert.crt
密钥文件路径 Key file path
/root/private.key
Sniffing
On
Save the new user.
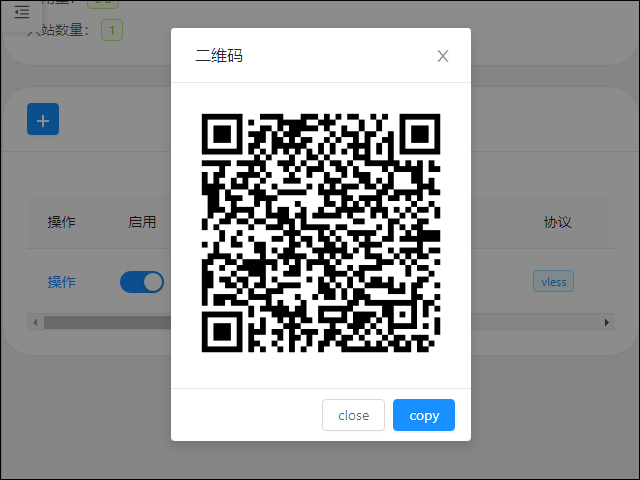
Click the 操作 (operating) button at the start of its row to display the QR code for the new user.
Client
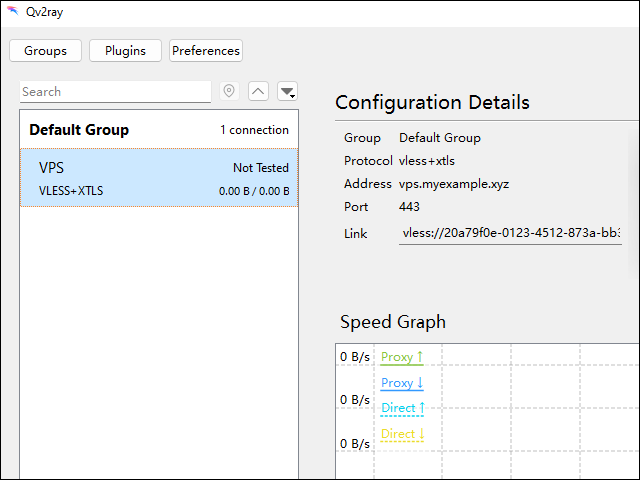
Clients are available for Android, iOS, Windows, macOS, and Linux. Examples are v2rayNG, Shadowrocket, and Qv2ray.
Enter anything you like for Country Name, State or Province Name, Locality Name, Organization Name, and Organizational Unit Name. For example:
1 2 3 4 5
Country Name (2 letter code) [AU]: State or Province Name (full name) [Some-State]:NSW Locality Name (eg, city) []:Sydney Organization Name (eg, company) [Internet Widgits Pty Ltd]: Organizational Unit Name (eg, section) []:
For Common Name, put Private CA.
Leave Email Address blank.
Leave the ‘extra’ attributes (challenge password and company name) blank.
Sign the certificate signing request, creating your certificate:
Enter anything you like for Country Name, State or Province Name, Locality Name, Organization Name, and Organizational Unit Name. For example:
1 2 3 4 5
Country Name (2 letter code) [AU]: State or Province Name (full name) [Some-State]:NSW Locality Name (eg, city) []:Sydney Organization Name (eg, company) [Internet Widgits Pty Ltd]: Organizational Unit Name (eg, section) []:
For Common Name, put example.com.
Leave Email Address blank.
Leave the ‘extra’ attributes (challenge password and company name) blank.
Sign the certificate signing request, creating your certificate:
Press any key to start...or press Ctrl+C to cancel
Press any key to continue.
Wait while the installs and compiles take place. This may take a long time.
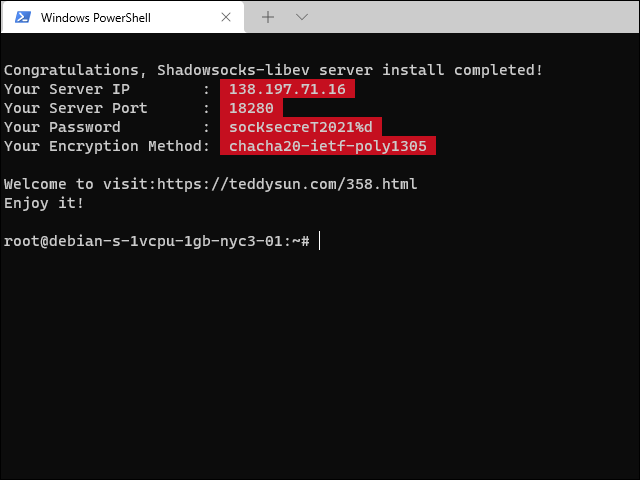
At the end of the install script, the parameters are redisplayed:
1 2 3 4 5 6 7 8
Congratulations, Shadowsocks-libev server install completed! Your Server IP : 123.45.67.89 Your Server Port : 8008 Your Password : socKsecreT2021%d Your Encryption Method: aes-256-gcm
Welcome to visit:https://teddysun.com/358.html Enjoy it!
Configure Shadowsocks on Server
Edit the Shadowsocks configuration file:
1
vi /etc/shadowsocks-libev/config.json
Add lines for the plugin and plugin options, like this:
Enter anything you like for Country Name, State or Province Name, Locality Name, Organization Name, and Organizational Unit Name. For example:
1 2 3 4 5
Country Name (2 letter code) [AU]: State or Province Name (full name) [Some-State]:NSW Locality Name (eg, city) []:Sydney Organization Name (eg, company) [Internet Widgits Pty Ltd]: Organizational Unit Name (eg, section) []:
For Common Name, put example.com.
Leave Email Address blank.
Leave the ‘extra’ attributes (challenge password and company name) blank.
Sign the certificate signing request, creating your certificate:
In Settings, under Network Settings, configure Firefox to use a SOCKSv5 proxy server at IP address 127.0.0.1, port 1080. Check the box to proxy DNS requests when using SOCKS v5.
Shadowsocks is one of the easiest tools you can use for censorship circumvention. In this tutorial, you’ll learn how to set up your own Shadowsocks server. You’ll also see how to connect to your server from a Windows client.
For ease and convenience, we’ll use a prewritten script to carry out the installation.
The version of Shadowsocks we install here is Shadowsocks-libev. This version is characterized by small memory footprint and is written in the C programming language for low CPU consumption. It is so efficient you can even run it on a router.
The tutorial demonstrates the set-up of a single-user Shadowsocks server. Shadowsocks-libev does not support multiple users each on their own port. If you need multiple users and ports, please install the Python, Go, or Rust version of Shadowsocks. The only way you can support multiple ports with Shadowsocks-libev is to create multiple instances of Shadowsocks.
So let’s get started.
Research VPS Providers
You’re going to need to do some research first. To run Shadowsocks, you need both a client and a server. You already have a client, which is your PC. But you need to rent a virtual private server, or VPS, to run the Shadowsocks server. Therefore you must research possible VPS providers. There are hundreds of them out there. We’ll mention only a few.
Enterprise VPS providers aim to provide servers reliable enough for a business to depend on. The top enterprise VPS providers are Amazon, Microsoft, and Google. Usually they offer a free trial for a limited time. After the free trial is over, they can become expensive. A fixed-cost alternative is Amazon Lightsail. Oracle is currently advertising an “always free” tier of services.
All the enterprise VPS providers require you to input a credit card number so that they can eventually bill you. Some of the mid-tier and smaller providers accept PayPal.
The cheapest possibility is to use a low-end provider where one public IPv4 address is shared among many customers. The provider performs network address translation, or NAT, to map your private IPv4 address to the public IPv4 address. For IPv6, you still get one or more addresses that are exclusive to your server. Because IPv4 addresses are in short supply, the cost of an IPv4 address makes up a significant part of the cost of your VPS. By sharing an IPv4 address, the NAT IPv4 VPS providers can get the cost down to just a few dollars per year. Some common ones are WebHorizon, Gullo, Mr. VM, and Inception Hosting.
Avoid Blocked IP Addresses
Countries that aggressively censor the Internet sometimes block the entire IP addresse range of common VPS providers. They may also block individual IP addresses if they discover a IP address hosts a Shadowsocks server.
Make sure the provider you choose is not blocked in your country. If there is a risk of individual IP addresses being blocked, make sure your intended provider allows you to cheaply and easily change IP address.
Choose VPS Size and Linux Distribution
Shadowsocks will run in 128 MB of RAM. The smallest size of VPS you can rent will be more than adequate. For most VPS providers, that means 512 MB or 1 GB. For NAT IPv4 VPS providers, you can run Shadowsocks on a 128 MB VPS under OpenVZ.
Check your intended VPS provider to see if they offer enough bandwidth for you. Each package will specify a monthly bandwidth limit.
When it comes to choosing a Linux distribution, we recommend either Debian or Ubuntu. The rest of this tutorial uses Debian 10.
Choose VPS Provider and Package
Based on your research, choose a VPS provider and package that meets your needs.
The rest of this tutorial illustrates the Shadowsocks installation process on a 1 GB VPS from Digital Ocean running Debian 10.
Create VPS
DigitalOcean uses the word “droplet” for what other providers call a “VPS” or “instance.”
Whatever provider you’re working on, you’ll need to go through the process to create your VPS. Here is the sequence of choices you’ll make to create a “droplet (or VPS) on DigitalOcean. You’ll make similar choices on other VPS providers.
Select a Linux distribution (Debian 10 in our example)
Choose a plan (e.g. Basic)
Select a CPU option (e.g. Regular Intel with SSD)
Add block storage (we do not need any extra volumes for this tutorial)
Choose a region near you (e.g. New York 3)
Choose a VPC network (e.g. default-nyc3)
Select additional options (choose whichever you want)
Authentication method (e.g. choose password, then type a strong root password)
Number of droplets (e.g. 1)
Choose a hostname (e.g. the default, debian-s-1vcpu-1gb-nyc3-01, will do)
Select a project (e.g. the default)
Add backups (you can leave this option unchecked unless you need a regular backup of your server)
Click Create Droplet.
It takes about a minute to create the VPS. Once it’s created, its public IPv4 address is displayed on your dashboard. You’ll need that in a moment.
Install Terminal Emulator
To log in to your server, you’ll need a terminal emulator. On macOS or Linux, your computer already includes a terminal emulator application. On Windows, you have various choices:
Choose your terminal emulator. If you’re going to use a native terminal application, such as the SSH command in Windows PowerShell), there is nothing extra to install. If you choose a non-native application, download and install the software of your choice.
SSH into Server
Secure Shell (SSH) is an encrypted network protocol for operating network services securely over an unsecure network. Remote command execution is a typical application. You’ll use SSH to log in to your VPS and execute the commands to install, configure, and monitor Shadowsocks.
SSH into your server now, using your chosen terminal emulator. In a command-line terminal emulator, you would use the ssh command.
Switch User to Root
We assume you logged in as the root user. If you are not root, you will have to switch user to root.
If you know the root password, you can skip ahead one command to the point where you switch user to root.
If you do not know the root password, you will have to set it with the passwd command. This needs to be prefixed by sudo. sudo is a program for Unix-like computer operating systems that allows users to run programs with the security privileges of another user, by default the root or super user. It originally stood for “superuser do”:
1
sudo passwd root
Set the password to something you know. You’ll need to enter the new password again to confirm it.
Now you know the root password, switch user to root:
1
su -
Enter root password. You are now root.
Update Server
Your VPS was created from an image that may be out of date. Therefore, before you install any extra software, get your existing software up to date. Update its list of packages:
1
apt update
The upgrade your software, based on the updated package lists:
1
apt upgrade
In future you can concatenate these two commands in one line, like this:
1
apt update && apt upgrade
The ampersand-ampersand operator means execute the second command, but only if the first command was successul. The second command will execute if the first command exited with a status code of zero, meaning success. If the exit status of the first command is non-zero, the second command will not be executed.
Protect Port 22
If you’ve never administered a server before, you’ll quickly learn that some people go round and round the Internet, trying to break in to every server in existence. That includes yours. It’s vital that you protect you server’s port 22, the port used to SSH into your server.
You can protect your server with a piece of software called fail2ban. Fail2ban is intrusion-prevention software that protects a server from hackers. It monitors log files for certain entries and takes action based on what it finds. In our case, Fail2ban will temporarily ban any IP address that makes too many failed login attempts too quickly.
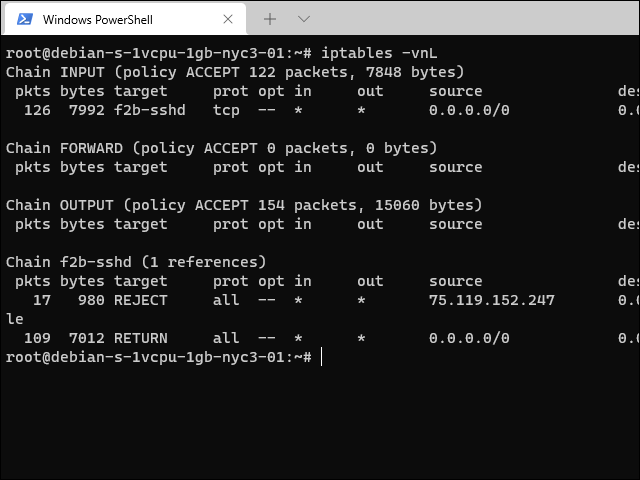
There’s an extra little twist that applies on Debian 10 servers. Fail2ban uses firewall software called iptables. On Debian 10, iptables is in a state of transition from legacy to current. To avoid confusion, explicitly specify that any reference to iptables means the old version:
Fail2ban creates and manages extra iptables rules to temporarily block IP addresses with too many failed login attempts.
Open Firewall for Shadowsocks
You have not yet specified any firewall rules except those that fail2ban created to limit bad login attempts. However, some VPS providers implement a system of security groups outside of the server’s iptables rules.
The script you run in a few minutes is going to randomly generate a port number between 9000 and 19999 for Shadowsocks. If your VPS providers uses security groups, you’ll need to open the security groups for input on ports 9000 through 19999. Note that, by default, Shadowsocks will listen on both TCP and UDP on its selected port.
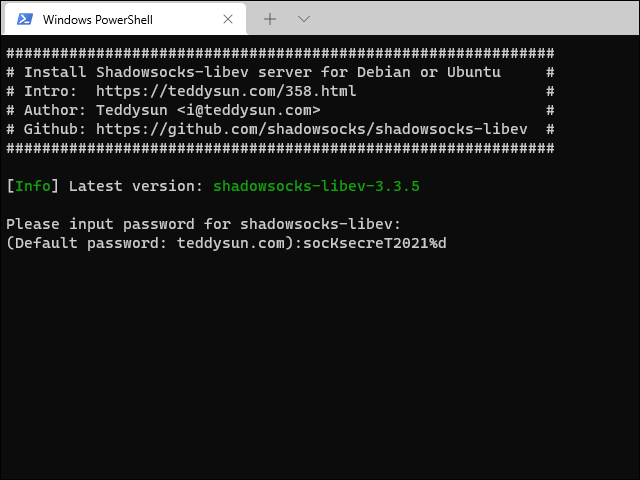
Choose a Password for Shadowsocks
The script is going to suggest a default password of teddysun.com. Obviously this is not the best password to use in the real world. Therefore invent a strong password now. It should be different from the root password you chose in step 5 when you created the VPS. Our example will be socKsecreT2021%d.
Download Script
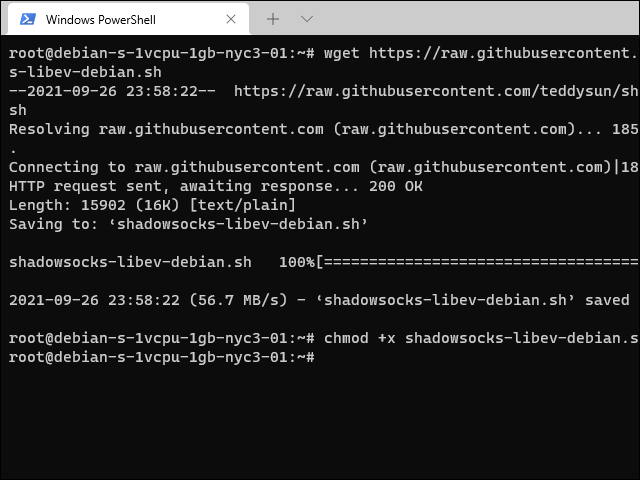
Download the script from GitHub by issuing this command in your terminal emulator:
Make the script executable by issuing the command to set the execution bit:
1
chmod +x shadowsocks-libev-debian.sh
Run Script
Issue the command:
1
./shadowsocks-libev-debian.sh
The user password can be set by yourself or, if you do not set it. the default is teddysun.com. We chose socKsecreT2021%d as an example of setting the password yourself.
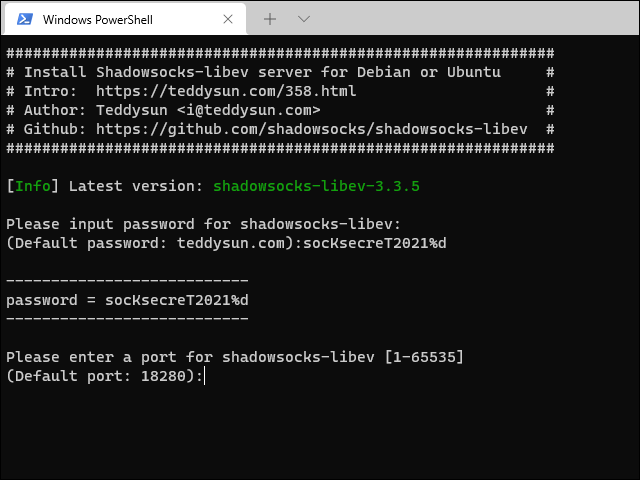
You will be prompted for a server port. You can set it by yourself of you like. If you do not set it, the port number will be randomly generated from 9000 to 19999 by default.
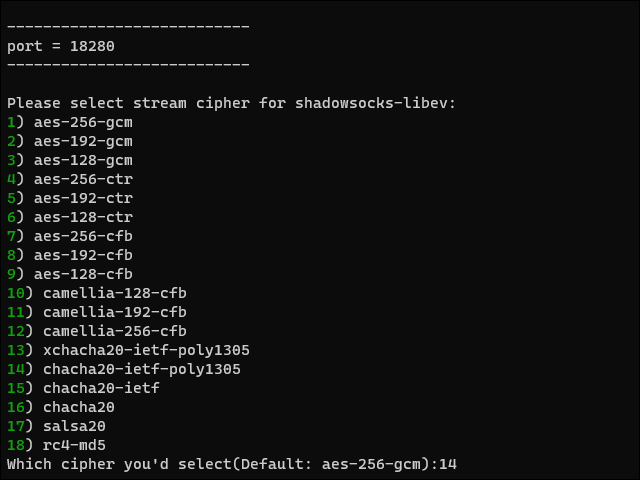
The encryption method can be set by yourself or, if you do not set it, the default is aes-256-gcm.
We recommend you set the encryption method to chacha20-ietf-poly1305. This is a modern, AEAD cipher.
Finally you are prompted to press any key to start, or Ctrl+c to cancel.
Shadowsocks-libev is compiled from source. This will take a few minutes.
After the installation is complete, the script prompts as follows:
1 2 3 4 5
Congratulations, Shadowsocks-libev server install completed!
Your Server IP: your_server_ip
Your Server Port: your_server_port
Your Password: your_password
Your Encryption Method: your_encryption_method
Shadowsocks-libev has been set to start automatically on boot.
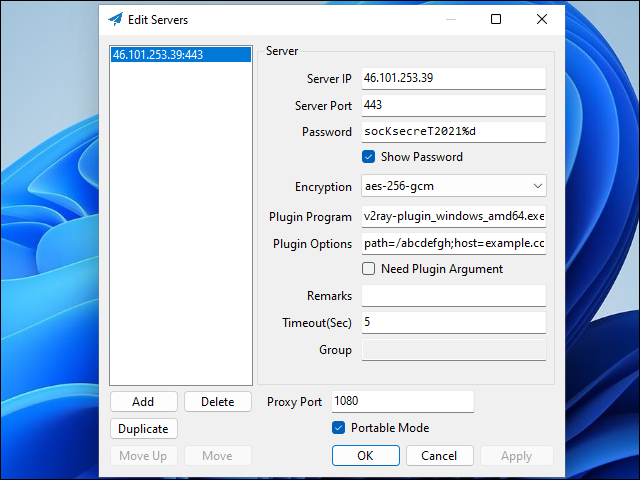
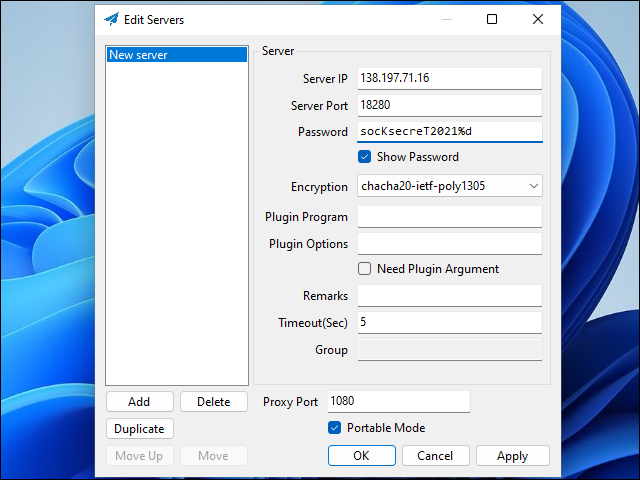
Start the Shadowsocks application for the first time. For server IP, put the IP address of your server. The port to aim for is the port used by the server scrript. Put the password you chose on your server. Our example is socKsecreT2021%d.
Apply the settings, then click OK.
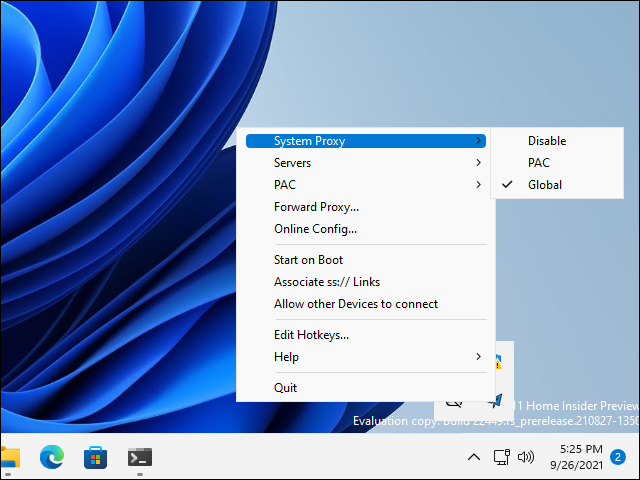
Find the Shadowsocks icon in the system tray. That’s at the bottom right of your Windows desktop. Right-click on the icon to bring up the Shadowsocks menu. Set the System Proxy to Global.
Test
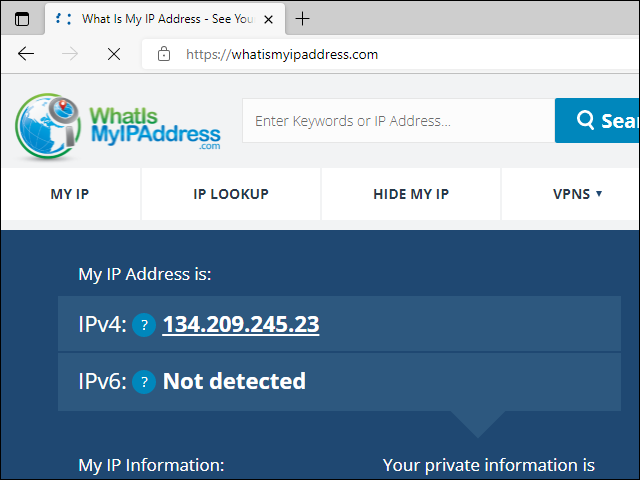
Open a browser and visit https://whatismyipaddress.com. It should look as though you are coming from the server’s IP address and location, not your PC’s address and location.
Troubleshooting and Maintenance
You can view the status of Shadowsocks on your server with the command:
1
/etc/init.d/shadowsocks status
If you modify the server configuration file /etc/shadowsocks-libev/config.json, you can restart the Shadowsocks service with the command:
1
/etc/init.d/shadowsocks restart
You can check Shadowsocks is listening with the commands:
1
2
3
apt install net-tools

netstat -tulpn
If an old version of Shadowsocks needs to be upgraded, you can download the latest version of this script and run it to automatically upgrade:
1
./shadowsocks-libev-debian.sh
If you ever need to uninstall, log in to the server as the root user and run the following command:
Outline is a product of Google Jigsaw, a unit of Google that seeks to harness technology to promote an open society. Before being named Jigsaw, the unit was known as Google Ideas. It was founded in 2010 under Jared Cohen, formerly of the U.S. State Department.
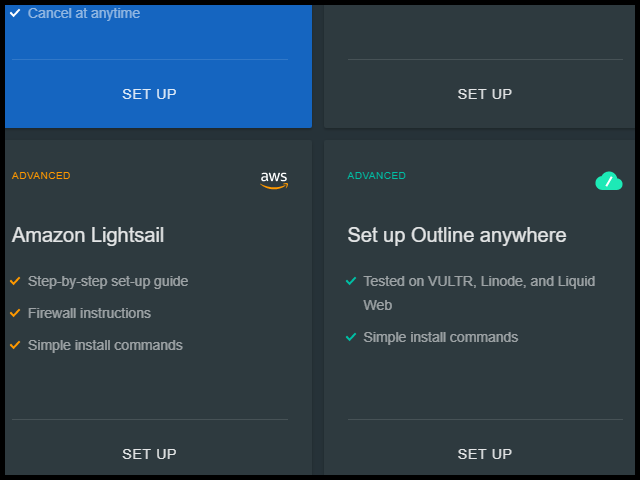
Outline VPN consists of a server manager and a client. Outline Manager will handle any server provider, but it has special features to automate the process on DigitalOcean, Amazon Lightsail, and Google Cloud. Builds of the Server Manager are available for Windows, Linux, and macOS. The Outline Client is available for Android, Windows, Chrome, iOS, macOS, and Linux.
A virtual private network or VPN typically routes all application and all protocols through an encrypted tunnel to a remote server.
A proxy server typically applies only to your browser or other applications specifically configured to use a proxy server.
Outline is a VPN in that it creates a new software interface and routes all traffic over it. However, under the hood, Outline implements Shadowsocks, which if used by itself is a proxy server protected by encryption.
Shadowsocks vs. Outline
Shadowsocks is the basis for Outline. It creates an encrypted tunnel between a Shadowsocks client and a Shadowsocks proxy server. Shadowsocks was created in 2012 by a Chinese programmer named clowwindy.
Since Outline runs on top of Shadowsocks, it can sometimes be quicker and more reliable simply to install Shadowsocks on your server and client instead of Outline.
Outline Manager runs on your PC but controls your Linux server.
Before beginning, make sure your server has high-numbered ports open for both TCP and UDP. Typically these are ports in the range 1024 through 65535.
Install Docker
Outline Server Manager will attempt to install Docker on your server. You can also install Docker on the server yourself. The instructions to install Docker on Ubuntu are given at https://docs.docker.com/engine/install/ubuntu. For Ubuntu 20.04 they are as follows.
At the end of the script, a process named outline-ss-server is listening on randomly generated ports. TCP access is required for the management port, and both TCP and UDP for the client port. The file /opt/outline/persisted-state/outline-ss-server/config.yml contains the parameters for the client(s) in YAML format.
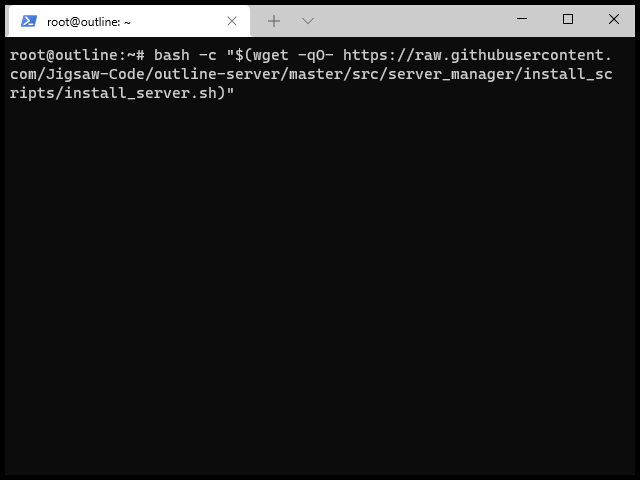
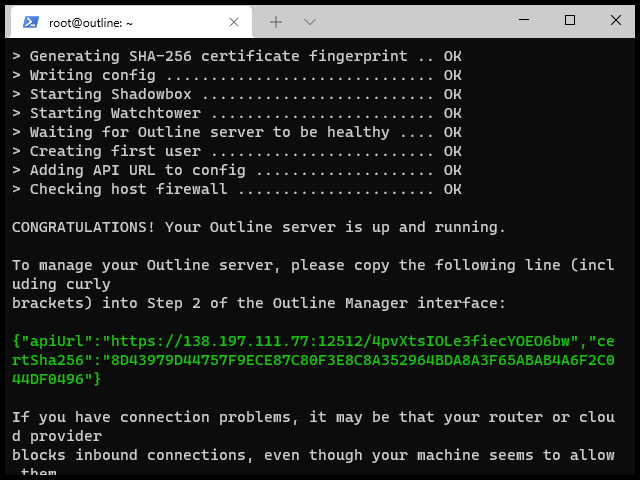
The output from the script will include lines that look like this:
1
2
3
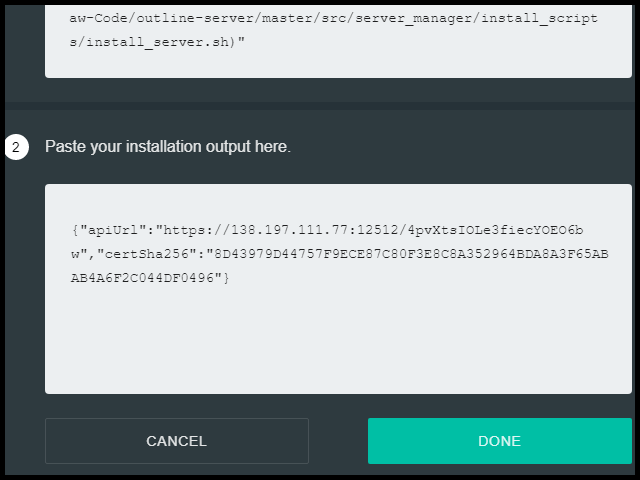
To manage your Outline server, please copy the following line (including curly brackets) into Step 2 of the Outline Manager interface:
Download the Outline Client from https://getoutline.org. On Windows, this gives you an installer, Outline-Client.exe. Run the installer.
Once the Outline Client is running, paste the Outline access key for the server into the Outline Client.
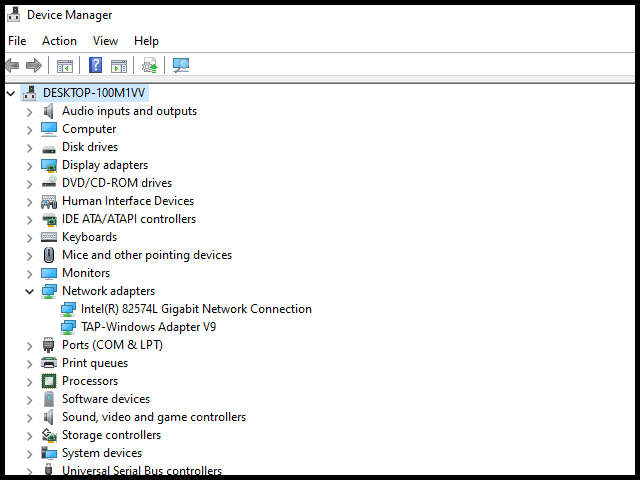
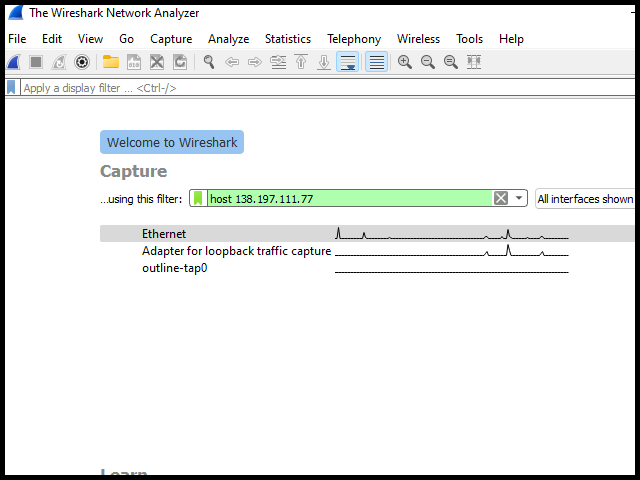
The Outline Client creates a TAP-Windows Adapter V9 named outline-tap0. You can view this in the Network Connections page of the Network and Sharing Center in the Control Panel. It also appears in the Device Manager in the Network adapter category.
The general principle is to uninstall the TAP-Windows Adapter V9 in the Device Manager in the Network adapter category. Also uninstall the Outline Client program in Control Panel. Then attempt to rerun the Outline Client installer.
Unexpected Error
Outline Client sometimes creates problems marked “Unexpected error.”
Download the Outline Client from https://getoutline.org. On Linux, the Outline Client is supplied as an AppImage file.
Make the AppImage executable:
1
2
3
cd ~/Downloads

chmod +x Outline-Client.AppImage
Then just run the AppImage directly:
1
./Outline-Client.AppImage
Outline Client creates an interface outline-tun0. It then changes the routing table so that this interface becomes the default route. This is what allows Outline to function as a VPN.
Troubleshooting
Server
On the server side, you can view the logs with:
1
docker logs shadowbox
And see if Outline is listening with:
1
ss -tulpn
For insoluble problems, consider installing Shadowsocks on server and client as a workaround.
Configure Firefox network settings to use the SOCKS5 proxy server that is now listening on 127.0.0.1 port 1080. Also set Firefox to proxy DNS queries over the SOCKS5 server.