Build Your Own Shadowsocks Server
Introduction
Shadowsocks is one of the easiest tools you can use for censorship circumvention. In this tutorial, you’ll learn how to set up your own Shadowsocks server. You’ll also see how to connect to your server from a Windows client.
For ease and convenience, we’ll use a prewritten script to carry out the installation.
The version of Shadowsocks we install here is Shadowsocks-libev. This version is characterized by small memory footprint and is written in the C programming language for low CPU consumption. It is so efficient you can even run it on a router.
The tutorial demonstrates the set-up of a single-user Shadowsocks server. Shadowsocks-libev does not support multiple users each on their own port. If you need multiple users and ports, please install the Python, Go, or Rust version of Shadowsocks. The only way you can support multiple ports with Shadowsocks-libev is to create multiple instances of Shadowsocks.
So let’s get started.
Research VPS Providers
You’re going to need to do some research first. To run Shadowsocks, you need both a client and a server. You already have a client, which is your PC. But you need to rent a virtual private server, or VPS, to run the Shadowsocks server. Therefore you must research possible VPS providers. There are hundreds of them out there. We’ll mention only a few.
Enterprise VPS providers aim to provide servers reliable enough for a business to depend on. The top enterprise VPS providers are Amazon, Microsoft, and Google. Usually they offer a free trial for a limited time. After the free trial is over, they can become expensive. A fixed-cost alternative is Amazon Lightsail. Oracle is currently advertising an “always free” tier of services.
All the enterprise VPS providers require you to input a credit card number so that they can eventually bill you. Some of the mid-tier and smaller providers accept PayPal.
Mid-tier providers are less expensive than the enterprise VPS providers. Examples are DigitalOcean, Linode, Vultr, Hetzner, Exoscale, OVH, RamNode, LunaNode, and Bandwagon Host.
The cheapest possibility is to use a low-end provider where one public IPv4 address is shared among many customers. The provider performs network address translation, or NAT, to map your private IPv4 address to the public IPv4 address. For IPv6, you still get one or more addresses that are exclusive to your server. Because IPv4 addresses are in short supply, the cost of an IPv4 address makes up a significant part of the cost of your VPS. By sharing an IPv4 address, the NAT IPv4 VPS providers can get the cost down to just a few dollars per year. Some common ones are WebHorizon, Gullo, Mr. VM, and Inception Hosting.
Avoid Blocked IP Addresses
Countries that aggressively censor the Internet sometimes block the entire IP addresse range of common VPS providers. They may also block individual IP addresses if they discover a IP address hosts a Shadowsocks server.
Make sure the provider you choose is not blocked in your country. If there is a risk of individual IP addresses being blocked, make sure your intended provider allows you to cheaply and easily change IP address.
Choose VPS Size and Linux Distribution
Shadowsocks will run in 128 MB of RAM. The smallest size of VPS you can rent will be more than adequate. For most VPS providers, that means 512 MB or 1 GB. For NAT IPv4 VPS providers, you can run Shadowsocks on a 128 MB VPS under OpenVZ.
Check your intended VPS provider to see if they offer enough bandwidth for you. Each package will specify a monthly bandwidth limit.
When it comes to choosing a Linux distribution, we recommend either Debian or Ubuntu. The rest of this tutorial uses Debian 10.
Choose VPS Provider and Package
Based on your research, choose a VPS provider and package that meets your needs.
The rest of this tutorial illustrates the Shadowsocks installation process on a 1 GB VPS from Digital Ocean running Debian 10.
Create VPS
DigitalOcean uses the word “droplet” for what other providers call a “VPS” or “instance.”
Whatever provider you’re working on, you’ll need to go through the process to create your VPS. Here is the sequence of choices you’ll make to create a “droplet (or VPS) on DigitalOcean. You’ll make similar choices on other VPS providers.
- Select a Linux distribution (Debian 10 in our example)
- Choose a plan (e.g. Basic)
- Select a CPU option (e.g. Regular Intel with SSD)
- Add block storage (we do not need any extra volumes for this tutorial)
- Choose a region near you (e.g. New York 3)
- Choose a VPC network (e.g. default-nyc3)
- Select additional options (choose whichever you want)
- Authentication method (e.g. choose password, then type a strong root password)
- Number of droplets (e.g. 1)
- Choose a hostname (e.g. the default, debian-s-1vcpu-1gb-nyc3-01, will do)
- Select a project (e.g. the default)
- Add backups (you can leave this option unchecked unless you need a regular backup of your server)
Click Create Droplet.
It takes about a minute to create the VPS. Once it’s created, its public IPv4 address is displayed on your dashboard. You’ll need that in a moment.
Install Terminal Emulator
To log in to your server, you’ll need a terminal emulator. On macOS or Linux, your computer already includes a terminal emulator application. On Windows, you have various choices:
Choose your terminal emulator. If you’re going to use a native terminal application, such as the SSH command in Windows PowerShell), there is nothing extra to install. If you choose a non-native application, download and install the software of your choice.
SSH into Server
Secure Shell (SSH) is an encrypted network protocol for operating network services securely over an unsecure network. Remote command execution is a typical application. You’ll use SSH to log in to your VPS and execute the commands to install, configure, and monitor Shadowsocks.
SSH into your server now, using your chosen terminal emulator. In a command-line terminal emulator, you would use the ssh command.
Switch User to Root
We assume you logged in as the root user. If you are not root, you will have to switch user to root.
If you know the root password, you can skip ahead one command to the point where you switch user to root.
If you do not know the root password, you will have to set it with the passwd command. This needs to be prefixed by sudo. sudo is a program for Unix-like computer operating systems that allows users to run programs with the security privileges of another user, by default the root or super user. It originally stood for “superuser do”:
1 | sudo passwd root |
Set the password to something you know. You’ll need to enter the new password again to confirm it.
Now you know the root password, switch user to root:
1 | su - |
Enter root password. You are now root.
Update Server
Your VPS was created from an image that may be out of date. Therefore, before you install any extra software, get your existing software up to date. Update its list of packages:
1 | apt update |
The upgrade your software, based on the updated package lists:
1 | apt upgrade |
In future you can concatenate these two commands in one line, like this:
1 | apt update && apt upgrade |
The ampersand-ampersand operator means execute the second command, but only if the first command was successul. The second command will execute if the first command exited with a status code of zero, meaning success. If the exit status of the first command is non-zero, the second command will not be executed.
Protect Port 22
If you’ve never administered a server before, you’ll quickly learn that some people go round and round the Internet, trying to break in to every server in existence. That includes yours. It’s vital that you protect you server’s port 22, the port used to SSH into your server.
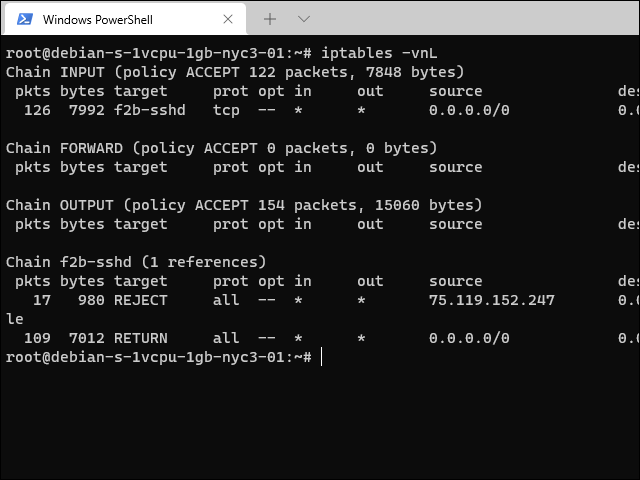
You can protect your server with a piece of software called fail2ban. Fail2ban is intrusion-prevention software that protects a server from hackers. It monitors log files for certain entries and takes action based on what it finds. In our case, Fail2ban will temporarily ban any IP address that makes too many failed login attempts too quickly.
There’s an extra little twist that applies on Debian 10 servers. Fail2ban uses firewall software called iptables. On Debian 10, iptables is in a state of transition from legacy to current. To avoid confusion, explicitly specify that any reference to iptables means the old version:
1 | update-alternatives --set iptables /usr/sbin/iptables-legacy |
Do the same thing for the IPv6 firewall using ip6tables:
1 | update-alternatives --set ip6tables /usr/sbin/ip6tables-legacy |
Now you can install fail2ban:
1 | apt install fail2ban |
Fail2ban creates and manages extra iptables rules to temporarily block IP addresses with too many failed login attempts.
Open Firewall for Shadowsocks
You have not yet specified any firewall rules except those that fail2ban created to limit bad login attempts. However, some VPS providers implement a system of security groups outside of the server’s iptables rules.
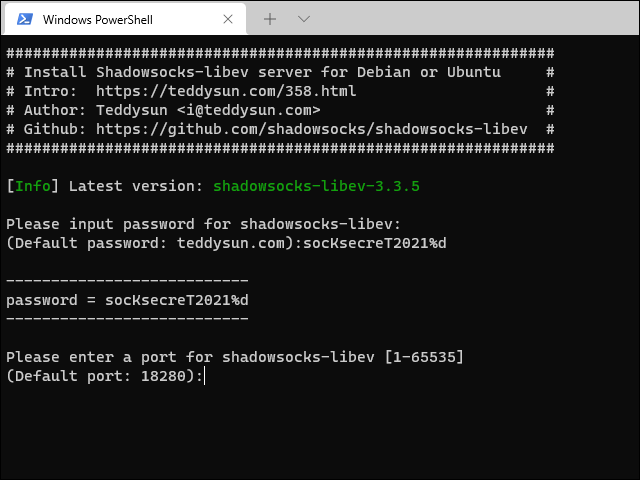
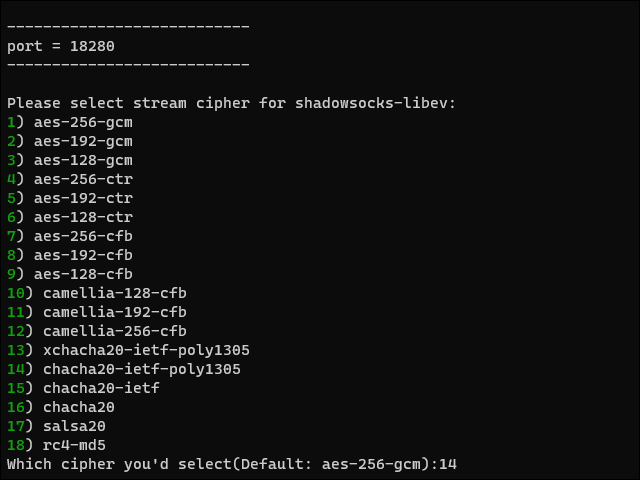
The script you run in a few minutes is going to randomly generate a port number between 9000 and 19999 for Shadowsocks. If your VPS providers uses security groups, you’ll need to open the security groups for input on ports 9000 through 19999. Note that, by default, Shadowsocks will listen on both TCP and UDP on its selected port.
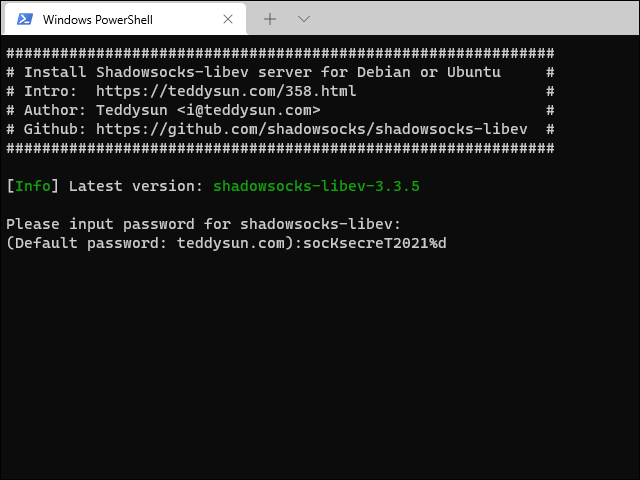
Choose a Password for Shadowsocks
The script is going to suggest a default password of teddysun.com. Obviously this is not the best password to use in the real world. Therefore invent a strong password now. It should be different from the root password you chose in step 5 when you created the VPS. Our example will be socKsecreT2021%d.
Download Script
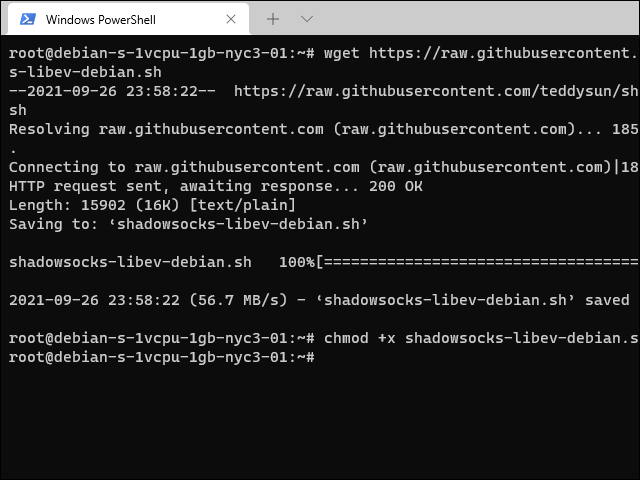
Download the script from GitHub by issuing this command in your terminal emulator:
1 | wget https://raw.githubusercontent.com/teddysun/shadowsocks_install/master/shadowsocks-libev-debian.sh |
Make the script executable by issuing the command to set the execution bit:
1 | chmod +x shadowsocks-libev-debian.sh |
Run Script
Issue the command:
1 | ./shadowsocks-libev-debian.sh |
The user password can be set by yourself or, if you do not set it. the default is teddysun.com. We chose socKsecreT2021%d as an example of setting the password yourself.
You will be prompted for a server port. You can set it by yourself of you like. If you do not set it, the port number will be randomly generated from 9000 to 19999 by default.
The encryption method can be set by yourself or, if you do not set it, the default is aes-256-gcm.
1 | 1) aes-256-gcm |
We recommend you set the encryption method to chacha20-ietf-poly1305. This is a modern, AEAD cipher.
Finally you are prompted to press any key to start, or Ctrl+c to cancel.
Shadowsocks-libev is compiled from source. This will take a few minutes.
After the installation is complete, the script prompts as follows:
1 | Congratulations, Shadowsocks-libev server install completed! |
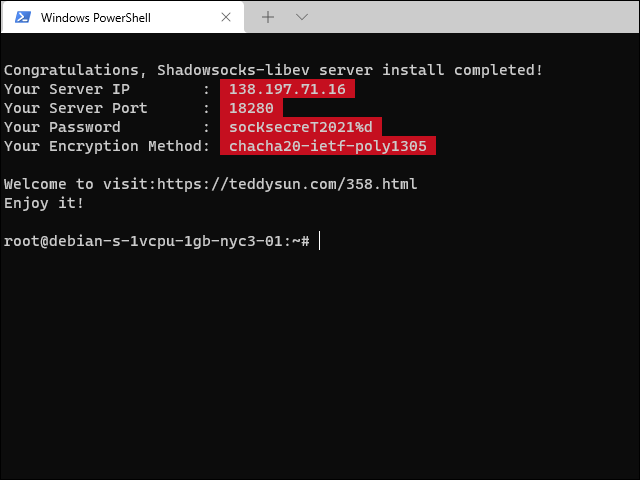
Shadowsocks-libev has been set to start automatically on boot.
Now it’s time to log off the server:
1 | exit |
Client
Switch to working on your PC. You can download the client for yout Windows PC from https://github.com/shadowsocks/shadowsocks-windows/releases. Download the latest zip file. After it’s downloaded, extract the zip file.

Start the Shadowsocks application for the first time. For server IP, put the IP address of your server. The port to aim for is the port used by the server scrript. Put the password you chose on your server. Our example is socKsecreT2021%d.
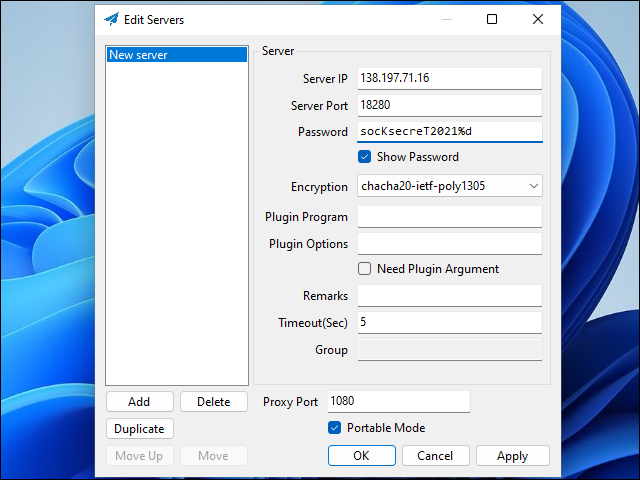
Apply the settings, then click OK.
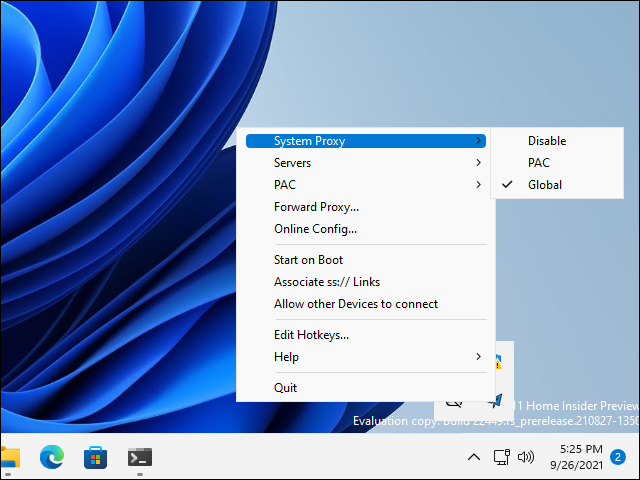
Find the Shadowsocks icon in the system tray. That’s at the bottom right of your Windows desktop. Right-click on the icon to bring up the Shadowsocks menu. Set the System Proxy to Global.
Test
Open a browser and visit https://whatismyipaddress.com. It should look as though you are coming from the server’s IP address and location, not your PC’s address and location.
Troubleshooting and Maintenance
You can view the status of Shadowsocks on your server with the command:
1 | /etc/init.d/shadowsocks status |
If you modify the server configuration file /etc/shadowsocks-libev/config.json, you can restart the Shadowsocks service with the command:
1 | /etc/init.d/shadowsocks restart |
You can check Shadowsocks is listening with the commands:
1 | apt install net-tools |
If an old version of Shadowsocks needs to be upgraded, you can download the latest version of this script and run it to automatically upgrade:
1 | ./shadowsocks-libev-debian.sh |
If you ever need to uninstall, log in to the server as the root user and run the following command:
1 | ./shadowsocks-libev-debian.sh uninstall |