Shadowsocks + V2Ray Plugin with Self-Signed Certificate
By following this post, you can create an SS + V2Ray plugin server without having to buy a domain name.
The server in this post runs Debian 11, and the client runs Windows 11.
Install Nginx on Server
1 | apt install nginx |
Create Self-Signed CA Certificate
Create a directory to hold your certificates:
1 | mkdir /etc/openssl |
Change into the directory that will hold your certificates:
1 | cd /etc/openssl |
Generate a private key for your CA certificate:
1 | openssl ecparam -out ca.key -name secp384r1 -genkey |
Generate a certificate signing request:
1 | openssl req -new -sha256 -key ca.key -out ca.csr |
Enter anything you like for Country Name, State or Province Name, Locality Name, Organization Name, and Organizational Unit Name. For example:
1 | Country Name (2 letter code) [AU]: |
For Common Name, put Private CA.
Leave Email Address blank.
Leave the ‘extra’ attributes (challenge password and company name) blank.
Sign the certificate signing request, creating your certificate:
1 | openssl x509 -req -sha256 -days 365 -in ca.csr -signkey ca.key -out ca.crt |
Create Server Certificate
Generate a private key for your server certificate:
1 | openssl ecparam -out example.com.key -name secp384r1 -genkey |
Generate a certificate signing request:
1 | openssl req -new -sha256 -key example.com.key -out example.com.csr |
Enter anything you like for Country Name, State or Province Name, Locality Name, Organization Name, and Organizational Unit Name. For example:
1 | Country Name (2 letter code) [AU]: |
For Common Name, put example.com.
Leave Email Address blank.
Leave the ‘extra’ attributes (challenge password and company name) blank.
Sign the certificate signing request, creating your certificate:
1 | openssl x509 -req -in example.com.csr -CA ca.crt -CAkey ca.key -CAcreateserial -out example.com.crt -days 365 -sha256 |
Make the server private key readable by Nginx:
1 | chmod +r example.com.key |
Configure Nginx
Generate Diffie-Hellman parameters:
1 | openssl dhparam -out /etc/nginx/dhparam 2048; |
This may take a long time.
Edit the Nginx default site:
1 | vi /etc/nginx/sites-available/default |
Delete the default contents, and enter contents as below:
1 | server { |
Change /abcdefgh to a secret path of your choice.
Save the configuration file.
Restart Nginx with your revised configuration file:
1 | systemctl restart nginx |
Download V2Ray Plugin to Server
Put software v2ray-plugin into directory /usr/bin/ like this:
1 | cd ~ |
Install Shadowsocks on Server
Download the Shadowsocks-libev install script for Debian from GitHub by issuing this command in your terminal emulator:
1 | wget https://raw.githubusercontent.com/teddysun/shadowsocks_install/master/shadowsocks-libev-debian.sh |
Make the script executable by issuing the command to set the execution bit:
1 | chmod +x shadowsocks-libev-debian.sh |
Think up a password. Our example is socKsecreT2021%d.
Think up a port number. Our example is 8008.
Choose an encryption method. Our example is aes-256-gcm.
Run the install script by issuing the command:
1 | ./shadowsocks-libev-debian.sh |
Enter your choise of password, port, and encryption method. Your run of the script will look like this:
1 | ############################################################# |
Press any key to continue.
Wait while the installs and compiles take place. This may take a long time.
At the end of the install script, the parameters are redisplayed:
1 | Congratulations, Shadowsocks-libev server install completed! |
Configure Shadowsocks on Server
Edit the Shadowsocks configuration file:
1 | vi /etc/shadowsocks-libev/config.json |
Add lines for the plugin and plugin options, like this:
1 | { |
Remember the comma after what used to be the last option.
Save the edited file.
Restart Shadowsocks on Server
Restart Shadowsocks with your configuration file which now specifies the V2Ray plugin:
1 | /etc/init.d/shadowsocks restart |
End work on server:
1 | exit |
Download CA Certificate to Client
Now you are going to work on the Windows PC that will be your client.
Open Windows PowerShell (right-click on Windows Start button, then select Windows Terminal).
Issue the command below, replacing 123.45.67.89 by your actual server IP address:
1 | scp root@123.45.67.89:/etc/openssl/ca.crt Downloads/ca.crt |
Close Windows PowerShell.
Import CA Certificate on Client
Open a Run box (Win+r), type mmc, and click OK.
In the Microsoft Management Console:
- Click File
- Select the option Add/Remove Snap-in
- In the window Add or Remove Snap-ins, select Certificates
- Click the Add button
- Select Computer account, and click Next
- Select Local computer, and click Finish
- Click OK
Expand the tree in the left pane. Then continue like this:
- Right-click on Trusted Root Certification Authorities
- Select All Tasks
- Select Import
- Click Next
- Browse to your
ca.crtfile in theDownloadsfolder - Click Open
- Click Next
- Click Next
- Click Finish
- Click OK
Close the Microsoft Management Console.
Download Shadowsocks to Windows Client
Open a browser and go to https://github.com/shadowsocks/shadowsocks-windows/releases.
Download the most recent release of Shadowsocks for Windows. For example, right now the most recent release is Shadowsocks-4.4.0.185.zip.
Unzip Shadowsocks-4.4.0.185.zip. This creates a folder Downloads\Shadowsocks-4.4.0.185.
Install 7-Zip
Install 7-Zip from https://www.7-zip.org if you do not have it on your PC already.
Download V2Ray Plugin to Windows Client
In your browser, download the most recent V2Ray plugin for Windows from https://github.com/shadowsocks/v2ray-plugin/releases. It will be named something like v2ray-plugin-windows-amd64-v1.3.1.tar.gz.
Right-click on the download, and use 7-Zip to extract v2ray-plugin-windows-amd64-v1.3.1.tar.
Right-click on that, and use 7-Zip again to extract from this the application v2ray-plugin_windows_amd64.exe.
Copy v2ray-plugin_windows_amd64.exe into the Shadowsocks folder Downloads\Shadowsocks-4.4.0.185.
Configure Shadowsocks on Windows Client
Start Shadowsocks.exe for the first time.
When the Edit Servers box appears:
- For Server IP, put the IP address of your server, e.g.
123.45.67.89 - For Server Port, put
443 - For Password put your chosen password, e.g.
socKsecreT2021%d - For Encryption, select your chosen method, e.g.
aes-256-gcm - For Plugin Program, put
v2ray-plugin_windows_amd64.exe - For Plugin Options, put
path=/abcdefgh;host=example.com;tls - Replacing
/abcdefghin the above by the secret path you configured Nginx to use
Click Apply.
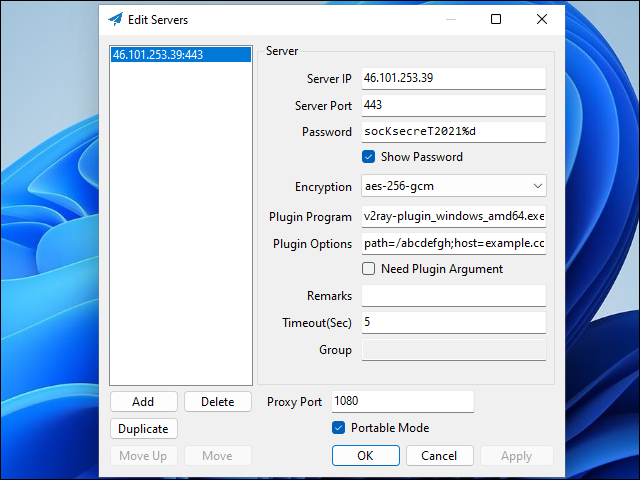
Click OK.
Install Firefox Browser
If you do not already have Firefox installed, install Firefox now from https://www.mozilla.org/en-US/firefox/new.
Configure Firefox Browser
From the Firefox hamburger menu, choose Settings.
In Settings, on the General page, under Network Settings, click Settings.
Configure Firefox to use a Manual proxy configuration.
Specify the SOCKS Host at IP address 127.0.0.1, Port 1080.
Check the box to proxy DNS requests when using SOCKS v5.
Click OK.
Test Windows Client to Server Connection
In Firefox, visit https://whatismyipaddress.com.
You should see the IP address and location of your server, not your client.